

SEO title: Leading Lines in Photography: A Simple Guide to Stronger Photos
Meta description: Learn how to use leading lines in photography to guide the viewer’s eye, create depth, and build stronger compositions with roads, fences, shorelines, shadows, and patterns.
URL slug: /photography-tips/leading-lines-photography/
Introduction
Give the eye somewhere to go.
That is the basic idea behind leading lines photography. A leading line is an actual or implied line within your frame that guides the viewer’s attention through the image, usually towards your main subject.
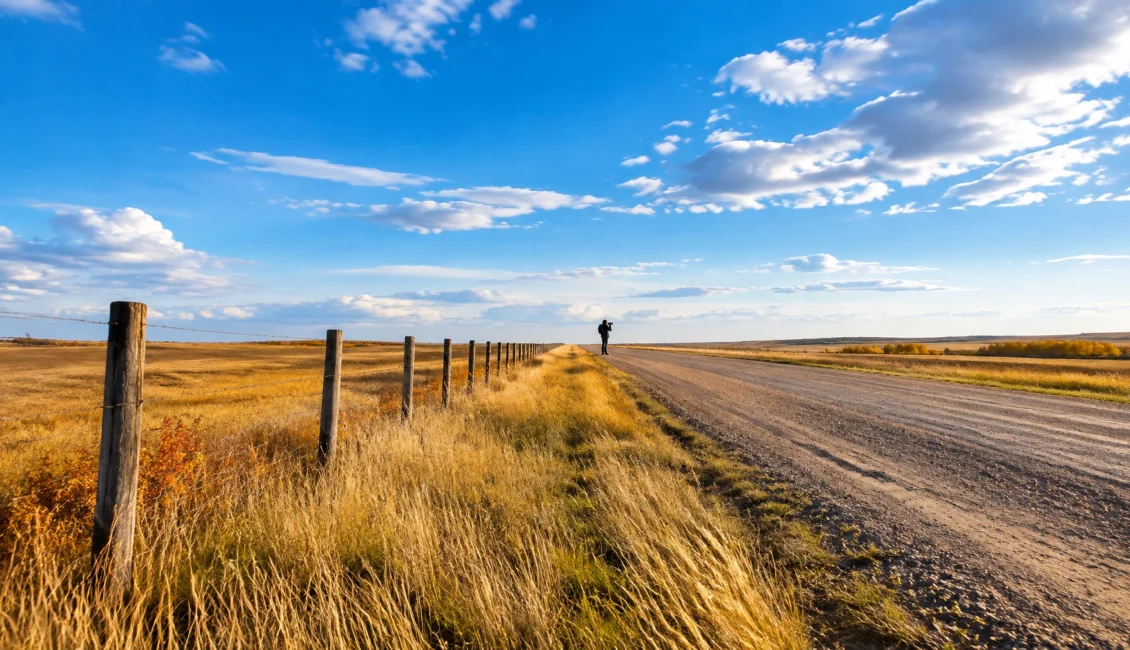
You can find leading lines almost anywhere: a road stretching across the prairie, a fence disappearing into the distance, a shoreline curving around a lake, or a patch of light crossing a dark floor. Once you begin looking for them, ordinary scenes become full of compositional possibilities.
Leading lines can help you:
- Direct attention towards your subject
- Create depth in a flat photograph
- Add movement and visual energy
- Connect the foreground, middle ground, and background
- Tell a clearer visual story
You do not need specialised equipment to use this technique. You need to notice the lines already around you, then position yourself with intention.
Welcome to the first article in the Saskatoon Photography Club’s weekly Photography Tip series. Each Thursday, we’ll explore practical ideas that can help you capture, share, and improve your photography.
What Are Leading Lines?
Leading lines are visual elements that guide the viewer’s eye from one part of a photograph to another. They often begin near the edge or bottom of the frame and move towards a subject, but they do not have to follow a perfectly straight path.
A line might be:
- Straight, such as a road, railing, or building edge
- Curved, such as a shoreline, river, or winding path
- Diagonal, creating movement and energy
- Converging, with two or more lines meeting near your subject
- Implied, formed by shadows, repeated objects, or a person’s gaze
The line itself does not have to touch the subject. It simply needs to create a visual relationship between the viewer’s starting point and the photograph’s main point of interest.
Think of it as a path through the image. Where does the eye enter? What does it notice next? Where does it finally come to rest?

Where to Find Leading Lines
Roads, paths, and walkways
Roads and paths are classic examples because they naturally create depth. A road that appears wide in the foreground and narrows towards the horizon can pull the viewer into the scene.
Try standing off-centre rather than placing the road directly in the middle. A diagonal road can feel more dynamic, while a centred road can create symmetry and a strong sense of direction.
Fences and railings
Fence posts, bridge railings, and stair rails often form repeated lines that point towards a distant subject. Their regular spacing also creates rhythm.
Look for a person, tree, building, or other focal point where the fence or railing seems to end. Be mindful of safety around roads, railways, and private property.
Shorelines and rivers
Water creates some of the most elegant leading lines. A shoreline may curve gently through the frame, while a river can lead from the foreground towards a distant bend.
Use the shape of the shoreline to guide the composition. A calm curve can create a peaceful mood; a sharply angled waterline can add more energy.
Light and shadow
Leading lines do not need to be solid objects. Light and shadow can create powerful implied lines across a wall, floor, field, or city street.
A long shadow may lead towards a person. A beam of light may point to a detail in an otherwise dark scene. Look carefully at how changing light creates temporary shapes, especially in the early morning or late afternoon.
Repeating patterns
Repeating patterns can form lines even when there is no single obvious path. In Saskatchewan, prairie stubble rows can sweep across a field and lead towards a farmhouse, grain elevator, tree line, or distant horizon.
Other examples include rows of trees, crop lines, paving stones, windows, and posts. Repetition gives the eye a predictable route through the photograph.

How to Use Leading Lines
1. Decide what your subject is
Before looking for a line, identify the photograph’s main subject.
Ask yourself:
Where do I want the viewer’s eye to end up?
Your subject could be a person, an animal, a building, a tree, or a small detail in a wider landscape. Once you know the destination, look for lines that support it.
A strong line without a clear destination can become visually confusing. The viewer follows it but may not know where to look next.
2. Choose your starting point
Your position determines how strongly a line appears in the photograph. Move closer to the foreground part of the line, then try changing your height and angle.
You might:
- Lower your camera position to make a road or fence feel more dramatic
- Step to one side to turn a horizontal line into a diagonal
- Move backwards to include more of the line’s starting point
- Shift left or right until the line points more directly towards the subject
Do not settle for the first position that looks acceptable. Take a few steps and watch how the relationships change.
3. Use diagonal lines for energy
Diagonal lines often make a photograph feel active and dynamic. A path running from the lower corner towards the upper third of the frame can create a strong sense of movement.
Diagonals work particularly well for:
- Roads and trails
- Sports and action
- Architecture
- Landscapes with strong perspective
- Subjects that suggest travel or progress
A more horizontal line can feel calm and stable, while a curved line can feel gentle and flowing. Consider whether the shape of your line matches the mood you want to create.
4. Use converging lines to highlight a subject
When two lines appear to meet, the point of convergence naturally attracts attention. This makes converging lines useful for placing a subject at the end of a road, fence, corridor, or railing.
Your subject does not always need to be exactly at the point where the lines meet. Placing it just before or just after that point can create a little more visual tension.

5. Check the edges of the frame
The edges of your photograph matter. A line that enters from the bottom corner and leads towards your subject can be helpful. A line that exits abruptly through the side of the frame may pull the viewer away from the image.
Before you press the shutter, inspect all four edges.
Look for:
- Lines leaving the frame in an unintended direction
- Bright objects that compete with your subject
- Cut-off posts, branches, or poles
- Empty space that weakens the visual path
- Unwanted clutter near the corners
You may need to recompose, change your position, or crop slightly during editing.
Common Mistakes to Avoid
Lines that lead out of the frame
A line can be visually strong but still work against you if it directs attention away from the subject. If a road or railing leads straight out of the side of the image, ask whether that exit is intentional.
Sometimes an outward path can suggest departure or openness. Other times, it simply loses the viewer. Decide what fits your story.
Too many competing lines
A busy scene may contain roads, poles, fences, shadows, and building edges all pointing in different directions. Instead of creating depth, they can compete for attention.
Try simplifying. Change your angle, exclude distracting elements, or choose one dominant line and let the others become secondary details.
A subject that is too small or unclear
Leading lines cannot rescue a subject that blends completely into the background. Make sure the subject has enough contrast, space, or visual importance to be noticed when the line reaches it.
Following the line instead of the story
A beautiful line is not automatically a meaningful composition. The line should support the subject and mood rather than become the entire point of the photograph, unless the line itself is your subject.
Try This Exercise
Find three leading lines in one location.
Choose a place you can explore safely, such as a park, walkway, shoreline, or open field. Make three different photographs:
- Use a straight line, such as a path, fence, or railing.
- Use a curved line, such as a shoreline, trail, or shadow.
- Use a repeating pattern, such as stubble rows, trees, posts, or paving stones.
For each photograph, try three positions:
- Standing at eye level
- Moving lower
- Shifting to one side
Then review the images and ask:
- Where does my eye enter the frame?
- Where does the line lead?
- Is the subject easy to find?
- Does anything at the edge pull attention away?
- Which camera position creates the strongest sense of depth?
This exercise is more valuable when you compare the results side by side. You will quickly see how a small change in position can completely alter the strength and direction of a line.
Final Tip
Do not photograph the line first. Photograph the destination.
Find the subject you want people to notice, then use the surrounding lines to guide them there. That simple shift keeps your composition purposeful.
Leading lines are one tool among many, but they are an excellent way to slow down and make deliberate choices before you capture an image.
Keep Learning With Us
Want to practise composition with other photographers? Join the Saskatoon Photography Club to share your photographs, take part in photo reviews and creative challenges, and keep developing your skills in a welcoming community of photographers at all levels.
Learn more about the Saskatoon Photography Club and check back next Thursday for the next Photography Tip article.